
This was our summer project.. A 16x25 cobwood barn. We plan on putting a small rocket-stove greenhouse in front. The warm attached greenhouse, plus the critters' body heat will hopefully keep the barn at a comfortable temperature for chickens, goats and an occasional calf or sick animal. The goal was to build the structure with the leftover cordwood from our house for as dirt cheap as possible. So far we haven't spent more than $500-$600 on it. We also experimented with a few new ideas along the way, using the barn as kind of a test project for load-bearing cobwood walls and a shallow sandbag foundation.
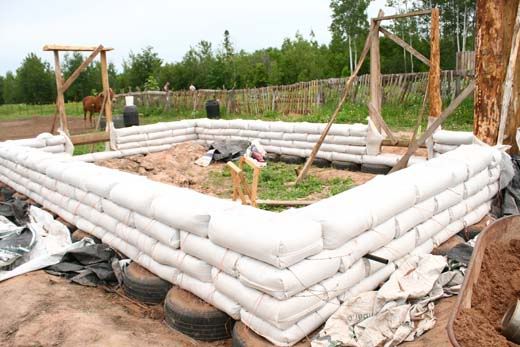
We excavated the site by hand and dug a trench, about a foot or two deep and a couple feet wide for gravel and drain tile. You can see the first course of gravel-packed tires under the sandbags. The bags could have gone right on the ground, but the tires offer a wider footing and I basically wanted to try packing a few of them earthship-style. It's a lot of work, and I wouldn't do it again unless I was building a foundation with nothing and had no bags available.


For anyone who's unfamiliar with cordwood building; you build with
firewood sized pieces of logs (16" usually), you leave a cavity in the
center that is filled with sawdust/lime or some other kind of insulation
to prevent the cold or heat to wick right through the wall. Cordwood is
typically done with cement, but we've chosen to build both our house
and this barn using cob as our mortar for the sake of keeping this more
natural and breathable (not to mention cheap!) We've not been
disappointed! Cob is amazing!! :)


Pros: Free.
Cons: A big pain to get the roof somewhat level and safe to walk on. Hardwood pallets are heavy and defiantly bend each and every nail you try to stick through them.
Pros: Free....
Also, you will notice that the front of the building is sandbags with an earthen plaster all the way up. This is to provide more thermal mass in the south-facing greenhouse back wall, as well as give us more experience with earth/sandbag building.


Over the pallets, we put down a layer of old carpeting, then a pvc billboard tarp for a waterproof membrane. Another layer of carpet over the plastic for extra protection, and finally a layer of hay bales for an insti-green roof. I imagine we'll seed it in spring..
Here's how it looked this afternoon:

Still need to put some windows and doors on..
I found this project exciting because of how cheap it was, and it wouldn't take too much more work to turn it into a warm and cozy cottage! The roof was practically free, minus the billboard and some nails.
Anyway, just thought I'd share. Cheers!
WOW!!! That is SO amazing! Only 600? How much more moneys do you think it would take to do a real house like that. This is seriously inspiring... I knew cob was amazing, but not this good or cheap. (I'll have to show this to Joey...:P ;)
ReplyDeleteThanks for sharing Andrew... this is SO cool!
I guess it depends on what you consider a "real house". ;-) It would also depend on your climate and insulation needs.. Around here, you would probably want a layer of insulation under the sod (possibly scavenged styrofoam?). Also, insulated windows and a good heat source. Free windows and doors would be more easily had in a warmer climate, due to less pickynes.. I guess I'm starting to ramble.. Prtty tough question, but I'm guessing that you could make that barn into a livable cottage just about anywhere in the country for about twice what we spent on it. YMMV. Best way to find out is to try it!! :)
ReplyDeleteHi, nice blog & good post. You have beautifully maintained it,Its really helpful for me, hope u have a wonderful day & awaiting for more new post. Keep Blogging! wonderful thermal pallet cover
ReplyDeleteThis is so deeply inspiring. It reminds me of a cottage in England or Scotland or Ireland. I am going to talk to my husband about the possibility of our building a studio for me this way. Do the edges of the logs that are showing stay safe from rotting if they are not plastered? We are in a very dry climate for the most part so it might not matter here anyway, though...thanks so much!
ReplyDeleteIt's amazing how when you first look at it. it looks like not much but with time it starts to look more and more like a home. By the time your done you marvel at what you created.
ReplyDelete-Zane of ontario honey
You guys are simply amazing! Wow! We raised 5 kids and are now starting our little hobby farm. Some people think we are crazy and others wish they could do it too! Thanks for all you do and we will definitely follow you guys!
ReplyDeleteGreat project! We are planning on doing something similar in the near future. I was hoping to see how you built you house, but the link just said "error". I have enjoyed all that I have read.
ReplyDeleteThanks for letting me know! I fixed the link--should work now.
DeleteThanks, worked just fine :-). Your house is beautiful! Someday we will try.......
ReplyDeleteThanks for the inspiration. Generous and brave work you do + increasingly valued. Cobwood seems perfect in the right place. Not much out there on the subject so this little project of yours is really progressive! from what you stated and I can see in photos the headers may not hold up to any significant wet snow load. With stick frame I think a 4' opening would have at least 2 2x6's on edge - but with heavier walls and a green roof maybe 3 - 2x12's ? At a certain load wood just snaps. My 2 cents...
ReplyDeleteHi there! They look thin in the pics, but they're a bit more beefy in actuality; maybe 3'' thick or so in the center. Even so, that would still be too small for standard construction. However, the monolithic nature of the cob also helps to spread the weight of the roof evenly through wall. There doesn't appear to be any strain or bending in the headers after 4 winters so far... Not claiming to be an authority figure on the subject; simply stating my observations thus far. This has been a cool experimental building to observe..
DeleteI've been doing a LOT of research into these beautiful cob homes. We really want to get started on our own when it warms up in the spring. Our goal is to go one level underground but I have not seen ANY helpful info about foundation/flooring for a cob home. I know it needs a good "hat" and "boots." But what about going underground, what do we put down on the ground to keep the cob at it's best to last a long time? Concrete? Rock? Tires? I'm so frustrated that I can't find any helpful info. I heard you can't just put cob on the bare ground. What did you do?
ReplyDeleteHi Jennifer! Are you talking about making a basement? The principles for making a good foundation apply to any construction style; there's nothing special about cob. It just needs be kept off the ground at least 6''-8'', perhaps more if you have a wet climate. If your foundation material will wick up moisture (ie. concrete), make sure to use a barrier under the cob to protect it, either a wooden sill (treated or cedar), or perhaps metal flashing, foam, etc. If your foundation is made of a very drain-able material, like rammed tires or bags with larger gravel, you may not need a moisture break.
DeleteGood luck!